了解如何使用核心数据云工具包
在 iCloud 用户之间共享核心数据对象
实施流程以使用 Core Data CloudKit 在 iCloud 用户之间共享数据。
概述
越来越多的人拥有多台设备,并使用它们来共享数字资产或协作工作。他们希望跨设备进行无缝数据同步,并轻松共享数据,同时考虑到隐私和安全。应用程序可以通过将用户数据移动到 CloudKit 并实现包含共享管理和访问控制等功能的数据共享流程来支持此类用例。
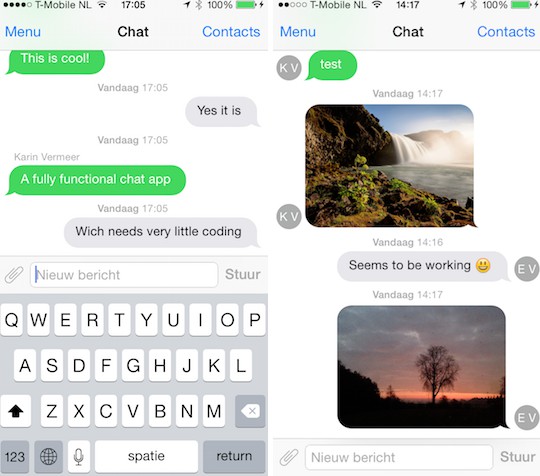
此示例应用程序演示如何使用Core Data CloudKit在iCloud用户之间共享照片。共享照片的用户(称为所有者)可以创建共享、发送邀请、管理权限和停止共享。接受共享的用户(称为参与者)可以查看或编辑照片,或停止参与共享。
配置示例代码项目
在构建示例 app 之前,请在 Xcode 中执行以下步骤:
- 在目标的“常规”窗格中,使用新标识符更新“捆绑标识符”字段。
CoreDataCloudKitShare - 在“签名和功能”窗格中,从“团队”下拉菜单中选择适用的团队,让 Xcode 自动管理预配配置文件。有关详细信息,请参阅将项目分配给团队。
- 确保 iCloud 功能存在且 CloudKit 选项处于选定状态,然后从“容器”列表中选择包含步骤 1 中的捆绑标识符的 iCloud 容器。如果容器不存在,请点按添加按钮 (+),输入容器名称(iCloud.<bundle 标识符>),然后点按“好”以让 Xcode 创建容器并将其与 App 关联。
- 如果希望使用现有容器,请从“容器”列表中选择该容器。
- 在 PersistenceController.swift 中为变量指定您的 iCloud 容器。iCloud 容器标识符区分大小写,并且必须以“”开头。
gCloudKitContainerIdentifieriCloud. - 与步骤 1 类似,更改 WatchKit 应用和 WatchKit 扩展目标的捆绑标识符和开发人员团队。捆绑标识符必须分别为 和。
<The iOS app bundle ID>.watchkitapp<The iOS app bundle ID>.watchkitapp.watchkitextension - 与步骤 2 类似,为 WatchKit 扩展目标指定 iCloud 容器。若要跨 iCloud 同步数据,iOS 应用和 WatchKit 扩展程序必须共享同一个 iCloud 容器。
- 打开 WatchKit 应用目标的 Info.plist 文件,然后将 WKCompanionAppBundleIdentifier 项的值更改为 。
<The iOS app bundle ID> - 打开 WatchKit Extension 目标的 Info.plist 文件,然后将 NSExtension> NSExtensionAttributes > WKAppBundleIdentifier 键的值更改为 。
<The iOS app bundle ID>.watchkitapp
若要在设备上运行示例应用,请按如下所示配置设备:
- 使用 Apple ID 登入。要同步 CloudKit 私有数据库,设备上的 Apple ID 必须相同。(对于 Apple Watch,请在配对的 iPhone 上的“手表”应用中登录,然后确保 Apple ID 显示在手表上的“设置”应用中。
- 对于 iOS 设备,选取“设置”> Apple ID > iCloud,然后打开“iCloud 云盘”(如果已关闭)。
- After running the sample app on the device, go to Settings > Notifications, and make sure “Allow Notifications” is on. For an Apple Watch, use the Watch app on the paired iPhone to make sure that notifications are on for the app.
To create and configure a new project that uses Core Data CloudKit, see Setting Up Core Data with CloudKit.
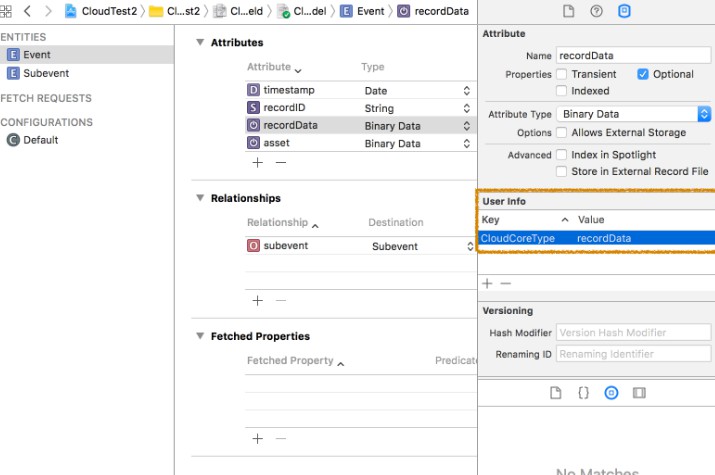
Create the CloudKit Schema for Apps
CloudKit apps must have a schema to declare the data types they use. When apps create a record in the CloudKit development environment, CloudKit automatically creates the record type if it doesn’t exist. In the production environment, CloudKit doesn’t have that capability, nor does it allow removing an existing record type or field, so after finalizing the schema, be sure to deploy it to the production environment. Without doing that, apps that work in the production environment, like the App Store or TestFlight ones, would not work. For more information, see Deploying an iCloud Container’s Schema.
Core Data CloudKit apps can use initializeCloudKitSchema(options:) to create the CloudKit schema that matches their Core Data model, or keep it up to date every time their model changes. The method works by creating fake data for the record types and then delete it, which can take some time and blocks the other CloudKit operations. Apps must not call it in the production environment, or in the normal development process that doesn’t include model changes.
To create the CloudKit schema for this sample app, pick the “InitializeCloudKitSchema” target from Xcode’s target menu, and run it. Having a target dedicated on CloudKit schema creation separates the call from the normal flow. After running the target, be sure to check with CloudKit Console if every Core Data entity and attribute has a CloudKit counterpart. See Reading CloudKit Records for Core Data for the detailed mapping rules.initializeCloudKitSchema(options:)
For apps that use CloudKit public database, manually add a index for the and fields of all record types, including the type that Core Data generates to manage many-to-many relationships.QueryablerecordNamemodifiedAtCDMR
For more information on this topic, see Creating a Core Data Model for CloudKit
Try out the Sharing Flow With the Sample App
To create and share a photo using the sample app, follow these steps:
- Prepare two iOS devices, A and B, and log in with a different Apple ID.
- Use Xcode to build and run the sample app on the devices.
- On device A, tap the Add(+) button to show the photo picker, then pick a photo and add it to the Core Data store.
- Long press the photo to show the action menu, then tap the “Create New Share” button to present the CloudKit sharing UI.
- Follow the UI to send a link to the Apple ID on device B. Try to use iMessage because it’s easier to set up.
- After receiving the link on device B, tap it to accept and open the share, which launches the sample app and shows the photo.
To discover more features of the sample app:
- On device A, add another photo, long press it and tap the “Add to Existing Share” button, then pick a share and tap the “Add” button. See the photo soon appears on Device B.
- On device B, long press the photo, tap the “Manage Participation” button to present the CloudKit sharing UI, then pick the Apple ID that has “(Me)” suffix and tap “Remove Me” to remove the participation. See the photo disappears.
- Tap the “Manage Shares” button, then pick the share, and try to manage its participants using
UICloudSharingControlleror the app UI.
It may take some time (minutes or longer) for one user to see the changes from the others. Core Data CloudKit is not for real-time synchronization. When users change the store on their device, it is up to the system to determine when to synchronize the change. There is no API for apps to speed up, slow down, or choose the timing for the synchronization.
Set up the Core Data Stack
Every CloudKit container has a private database and a shared database. To mirror these databases, set up a Core Data stack with two stores, and set the store’s database scope to and respectively..private.shared
When setting up the store description, enable persistent history tracking and turn on remote change notifications by setting the and options to . Core Data relies on the persistent history to track the store changes, and apps need to update their UI when remote changes occur.NSPersistentHistoryTrackingKeyNSPersistentStoreRemoteChangeNotificationPostOptionKeytrue
- CodeListing: setOption
For apps (under the same developer team) to synchronize data through CloudKit, they must use the same CloudKit container. This sample app explicitly specifies the same container for its iOS and watchOS apps when setting up the CloudKit container options:
- CodeListing: NSPersistentCloudKitContainerOptions
Share a Core Data object
Sharing a Core Data object between iCloud users includes the following tasks:
- On the owner side, create a share with an appropriate permission.
- Invite participants by making the share link available to them.
- On the participant side, accept the share.
- On both sides, manage shares. Owners can stop sharing the object, change the share permission for a participant. Participants can stop their participation.
NSPersistentCloudKitContainer provides methods for creating a share (CKShare) for Core Data objects and managing the interaction between the share and the associated objects. implements the share invitation and management. Apps can implement a sharing flow using these two APIs.UICloudSharingController
To create a share for Core Data objects, call share(_:to:completion:). Apps can choose creating a new share, or adding the objects to an existing share. Core Data uses CloudKit zone sharing so each share has its own record zone on the CloudKit server. (For more details, see WWDC21 session 10015: Build Apps that Share Data Through CloudKit and Core Data and WWDC21 session 10086: What’s new in CloudKit.) CloudKit has a limit on how many record zones a database can have. To avoid hitting the limit, consider using an existing share if appropriate.
See the following method for how this sample app shares a photo:
- CodeListing: shareObject
NSPersistentCloudKitContainer doesn’t automatically handle the changes (or other CloudKit APIs) makes on a share. When the kind of changes happen, apps must update the Core Data store by calling persistUpdatedShare(_:in:completion:). The sample app implements the following UICloudSharingControllerDelegate method to persist a updated share.UICloudSharingController
- CodeListing: cloudSharingControllerDidSaveShare
Similarly, when owners tap the “Stop Sharing” button or participants tap the “Remove Me” button in the CloudKit sharing UI, doesn’t immediately know the change. To avoid stale UI in this case, implement the following delegate method to purge the Core Data objects and CloudKit records associated with the share using purgeObjectsAndRecordsInZone(with:in:completion:).NSPersistentCloudKitContainer
- CodeListing: cloudSharingControllerDidStopSharing
Core Data doesn’t support cross-share relationships. That is, it doesn’t allow relating objects associated with different shares. When sharing an object, Core Data moves the whole object graph (including the object and all its relationships) to the share’s record zone. When users stop a share, Core Data deletes the object graph. In the case where apps need to reserve the data when users stopping a share, make a deep copy of the object graph and make sure no object in the graph is associated with any share.
Detect Relevant Changes by Consuming Store Persistent History
When importing data from CloudKit, records the changes on Core Data objects in the store’s persistent history, and triggers remote change notifications () so apps can keep their state up to date if necessary. The sample app observes the notification and does the followings in the notification handler:NSPersistentCloudKitContainer.NSPersistentStoreRemoteChange
- Gather the relevant history transactions (
NSPersistentHistoryTransaction), and notify the views that remote changes happen. Note that the changes on shares don’t generate any transactions. - The views that present photos merge the transactions to the of the persistent container, which triggers a SwiftUI update. Views relevant to shares fetch the shares from the stores, and update with them.
viewContext - Detect the new tags from CloudKit, and remove duplicate tags if necessary.
To process the persistent history more effectively, the app:
- Maintains the token of the last transaction it consumes for each store, and uses it as the starting point of next run.
- Maintains a transaction author, and uses it to filter the transactions irrelevant to Core Data CloudKit.
- Only fetches and consumes the history of the relevant persistent store.
This is the code that sets up the history fetch request ():NSPersistentHistoryChangeRequest
- CodeListing: fetchHistory
For more information about persistent history processing, see Consuming Relevant Store Changes.
Remove Duplicate Data
In the CloudKit environment, duplicate data is sometimes inevitable:
- Different peers can create same data. In this sample app, owners can share a photo with a permission that allows participants to tag it. When owners and participants simultaneously create a same tag, a duplicate occurs.
- Apps rely on some initial data and there is no way to allow only one peer to preload it. Duplicates occur when multiple peers preload the data at the same time.
To remove duplicate data (or deduplicate), implement a way that allows all peers to eventually reserve the same winner and remove others. The sample app removes duplicate tags in the following way:
- Give every tag a universally unique identifier (UUID). Tags that meet the following criteria are duplicates and only one should exist:
- They have a same tag name. (Their UUIDs are still different.)
- They are associated with a same share, and so are in the same CloudKit record zone.
- Detect new tags from CloudKit by looking into the persistent history every time a remote change notification occurs.
- For each new tag, fetch the duplicates from the same persistent store, and sort them with their UUID so the tag with the smallest UUID goes first.
- Pick the first tag as the winner and remove the others. Because UUID is globally unique and every peer picks the first tag, all peers eventually reach to the same winner, which is the tag that has the globally smallest UUID.
The sample app only detects and removes duplicate tags from the owner side because participants may not have write permission. That is, deduplication only applies to the private persistent store.
See the following method for the code that deduplicate tags:
- CodeListing: deduplicateAndWait
Implement a Custom Sharing Flow
When is unavailable or doesn’t fit the app UI, consider implementing a custom sharing flow if necessary. ( is unavailabe on watchOS. On macOS, use NSSharingService with the .cloudSharing service.) To do that, here are the steps and relevant APIs:UICloudSharingControllerUICloudSharingController
- On the owner side, pick the Core Data objects to share, and create a share with them using .
share(_:to:completion:) - Configure the share with appropriate permissions, and add participants if it’s a private share.
A share is private if itspublicPermissionis more permissive than.none. For shares that have public permission (called public shares), users can participate by tapping the share link, hence no need to add participants beforehand. Look up the participants usingfetchParticipants(matching:into:completion:)orCKFetchShareParticipantsOperation, then add them to the share by callingaddParticipant(_:). Configure the participant permission usingCKShare.ParticipantPermission..none - Implement a mechanism for the owner to deliver the share link (
CKShare.url). - On the participant side, accept the share.
After receiving the share link, participants tap it to accept the share and open the app. The system callswindowScene(_:userDidAcceptCloudKitShareWith:)(oruserDidAcceptCloudKitShare(with:)on watchOS) when launching the app in this context, and the app accepts the share usingacceptShareInvitations(from:into:completion:)orCKAcceptSharesOperation. After the acceptance synchronizes, the objects the owner shares are available in the participant’s store that mirrors the CloudKit shared database. - On the owner side, manage the participants of the share using and , or stop the sharing by calling .
addParticipant(_:)removeParticipant(_:)purgeObjectsAndRecordsInZone(with:in:completion:) - On the participant side, stop the participation by calling .
purgeObjectsAndRecordsInZone(with:in:completion:)
In the whole process, whenever changing a share using CloudKit APIs, call so Core Data persists the change to the store and synchronize it with CloudKit. As an example, this sample uses the following code to add a participantpersistUpdatedShare(_:in:completion:)
-
CodeListing: addParticipant
-
Note: To be able to accept a share when users tap a share link, the app’s file must contain the key and its value must be .
info.plistCKSharingSupportedtrue